Dynamic Timing a Honda CT90 or similar Single Cylinder Motorcycle
In general, I have always statically timed the CT90's that I own and have been happy with the results. The bikes are easy to start and have good performance (assuming the plug, points, coil and wiring were all good...), but I have always wondered if dynamically timing my CT90's would make much of a difference, so I decided to dig out my dwell meter and timing light and spend some time dynamically timing one of my CT90's to see what I could learn and then share that information here in this post.
I also did an earlier post that included how to statically time a CT90 at the following link: The Basic Sequence and Process to Set or Adjust your CT90 Timing
In this post I'm also going to provide information related to adjusting your points, as the points, or more specifically setting the dwell angle, is so interrelated with engine timing that from my perspective you need to always check both anytime you feel the need to work on one or the other.
In addition to the mechanics of setting the dwell and timing, I will also dig down and share some additional insight in a few areas that are hopefully interesting and helpful to others interested in dynamically timing a CT90.
Listed below are the steps I plan on following when setting my CT90 timing dynamically:
1. Dress and clean the points
2. Set the point gap /dwell angle
3. Check the dwell angle with the dwell meter
4. Set the timing statically
5. Check the timing dynamically at idle and verify that it has not changed significantly from the static setting (ideally not more then a few degrees). If out a significant amount, adjust the timing so that dynamically at idle the pointer lines up close to the mark next to the F on the generator rotor.
6. Increase the engine RPM's to approximately 3500 RPM's and verify that the timing advances with RPM's and that the maximum advance results in the pointer being within the two advance timing marks on the generator rotor.
7. If after performing the above adjustments my CT90 runs great at idle and at speed, then I will document the dwell angle and other timing information so that the next time the bike doesn't seem to be running well or if I had to do work on the bike, I have an initial set of settings to use that worked well in the past.
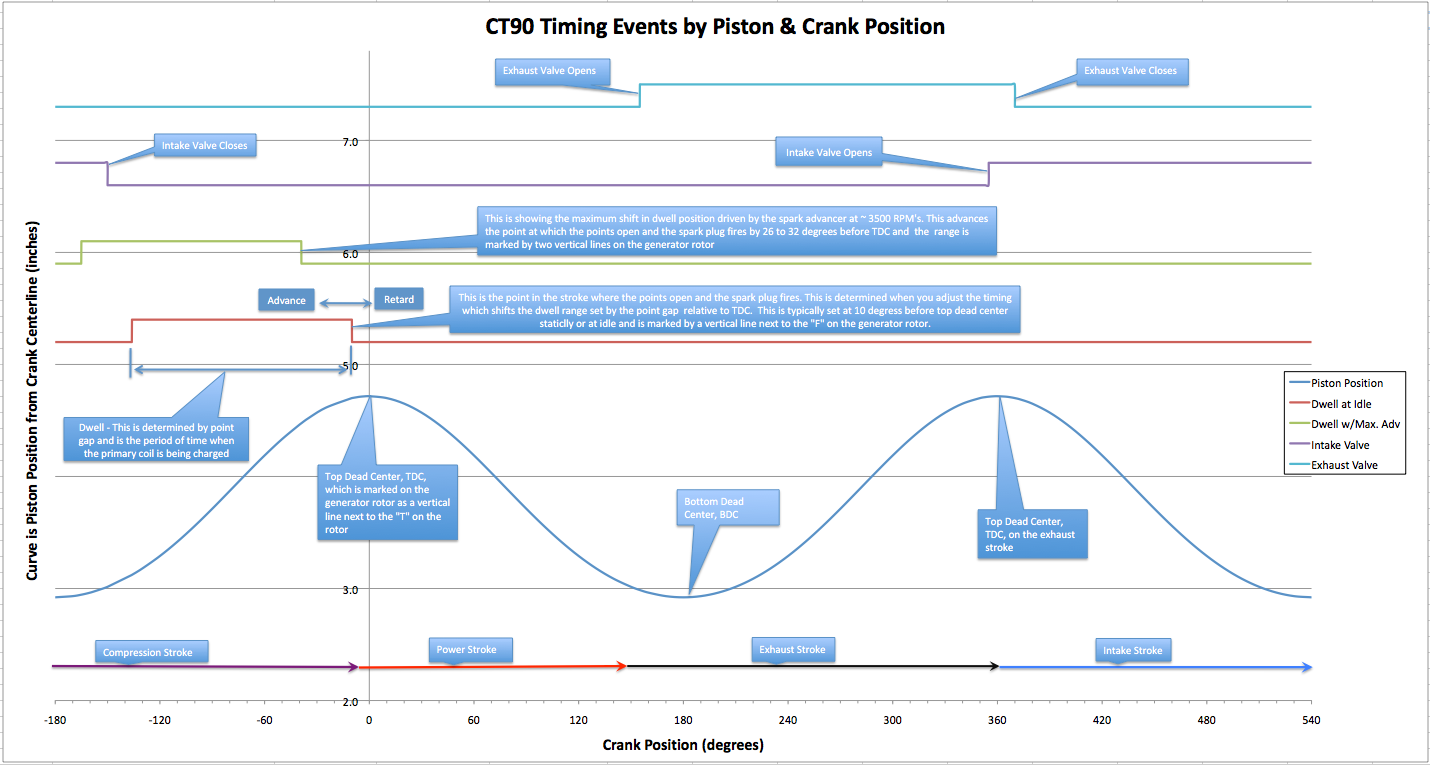
To help myself better understand the different events going on within the CT90 engine I put together the chart below (you should be able to scroll to the right to see the whole chart).
From the chart above you can see that there are two basic things being accomplished when you adjust the points/set the dwell angle and then set the timing:
1. With the dwell angle you are determining the time available for current to be applied to the primary coil and allow it to reach its full potential or become saturated.
2. With the timing you are positioning the dwell period so that when it ends and the points open (which results in a spark at the spark plug) that it is at the ideal point in the stoke before top dead center.
You can also see in the chart the effect the spark advancer has on shifting/advancing the dwell period at higher RPM's. Since the fuel/air mixture in the cylinder burns a a constant rate you need to advance the point in time the spark ignites the mixture at higher RPM's so that there is enough time for the pressure in the cylinder to build up to the maximum level that coincides with the ideal point in the stroke after top dead center that will produce the greatest amount of power.
Setting the Dwell Angle
The first step in dynamically timing a CT90 is to set the dwell angle by adjusting the gap in the point assembly. Once the gap is set then the bike can be started and a dwell meter attached and with the engine running, verify that the desired dwell angle has been achieved. If not then the points can be adjusted and the process repeated until the desired dwell angle is reached.
The first time you take this approach you really won't know what dwell angle to adjust your points too, but the real benefit from using a dwell angle verses just setting the gap in your points is that once you find a point gap/dwell angle and timing setting that works well with your bike, you will be able very accurately go back and recreate that same dwell angle in the future. Using feeler gages to set the gap in your points and therefore the dwell angle, can be a very repeatable process and is generally more then adequate, but using a dwell meter gives you a direct reading of what you are really trying to accomplish.
A good practice when setting your dwell angle is to make sure the points are in good shape, flat, and clean. If there is any question, then you should dress your points with an appropriate file and clean them as well, so that they have a nice clean electrical break when they operate.
Whenever I provide a dwell angle in this post, I will refer to that angle in degrees of the "camshaft rotation" which is actually half the angle of rotation of the main crankshaft due to the gear driving the timing chain on the crank only having half the teeth of the timing gear that is driving the camshaft.
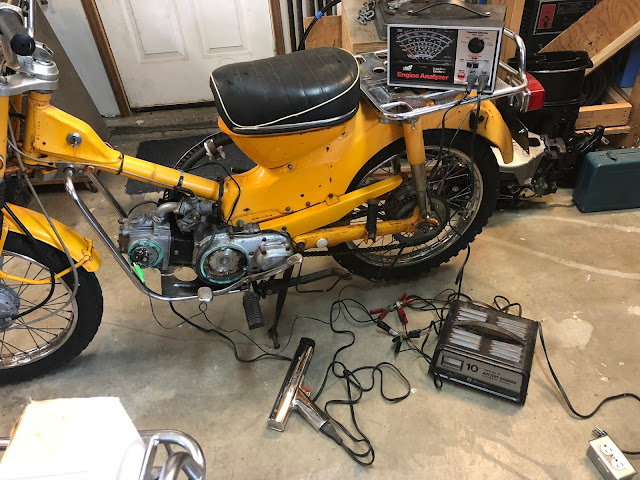
To measure the actual dwell angle I used an old Craftsman Engine Analyzer I own that includes a dwell meter. The picture below is of the meter setting on the rear rack of the bike connected to my CT90. I used a 12 volt battery charger to power the dwell meter and one detail you need to be aware of when taking this approach is that you need to ground the negative lead of the meter and battery charger to the CT90 for the meter to work correctly.
The only other connection from the meter to the CT90 is with the one lead that needs to be connected to the lead from the ignition coil to the points which I just connected as shown in the picture below.
The only issue with using this meter on my CT90 is that it only has a scale for 8, 6, and 4 cylinder engines and nothing for a single cylinder engine like my CT90. This ends up only being a minor issue as you can use the reading from the 8, 6, or 4 cylinder scales with a little math to get to a correct reading for a single cylinder CT90.
To convert the dwell angle measured on a CT90 using a meter for a multi cylinder engine, you would multiple the indicated reading from the meter by the ratio of the degrees of distributor cam rotation required to fire a single cylinder one time between the CT90 and the multi-cylinder engine scale you were using from the meter.
For a CT90 the overhead cam directly drives the cam lobe that actuates the points assembly and it requires 360 degrees of cam rotation to fire the spark plug one time. For an 8 cylinder engine the distributor cam only has to rotate 45 degrees to fire each spark plug compared to 60 degrees and 90 degrees on a 6 cylinder and 4 cylinder engine respectively.
Example for 8 cylinders engine: CT90 Dwell Angle = 360/45 * reading from meter for 8 cylinder
Example for 6 cylinders engine: CT90 Dwell Angle = 360/60 * reading from meter for 6 cylinder
Example for 4 cylinders engine: CT90 Dwell Angle = 360/90 * reading from meter for 4 cylinder
The resulting CT90 dwell angles from the examples above would be in degrees of the overhead cam. To convert the dwell angle that is in degrees of the cam rotation to degrees of the crank rotation you would simply multiply by two.
For example if you used the eight cylinder scale on a dwell meter connected to your CT90 and the reading was nine degrees, then the dwell angle in terms of CT90 cam rotation would be equal to 9 x (360/45) = 72 degrees. In terms of CT90 crank rotation it would be 2 x 72 = 144 degrees.
From the Honda CT90 manual, the recommended point gap setting is .012 to .016 inches. I wanted to know what the corresponding dwell angle would be for each of the end values from the Honda recommended range, so I first set the points to .012 inches and then recorded the dwell angle and then I set the points to .016 inches and also recorded the dwell angle.
Here are the results for my CT90:
Given that the Honda manual states an acceptable range for your point gap to be within, you may ask yourself why should I care what my point gap is as long as it is within the recommended range? The short answer is that for the most part it probably doesn't make much of a difference, but it is good to understand how the point gap and resulting dwell angle impact the charging of your coil.
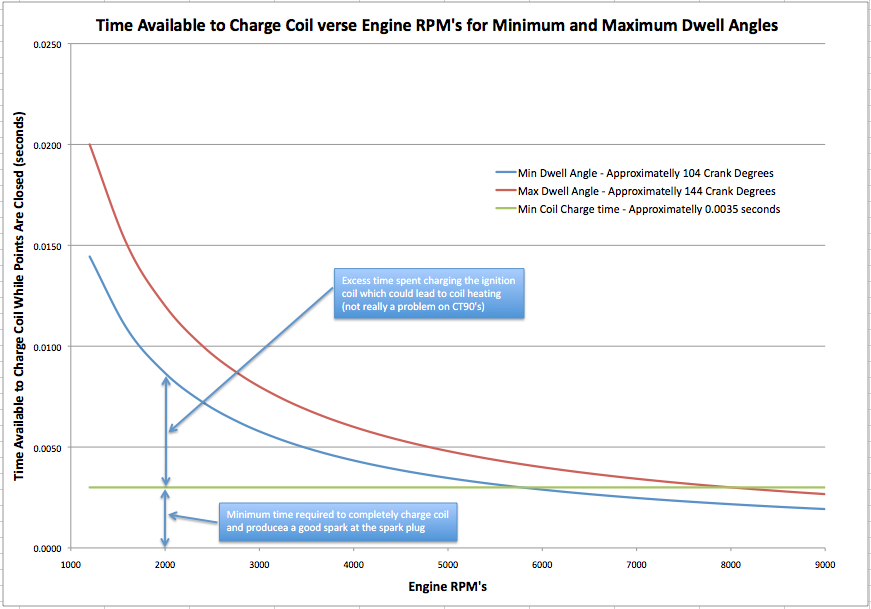
I put together the following chart to show the relationship between the time available to charge/saturate your coil verses engine RPM's for both the minimum and maximum dwell angles.
For a typical ignition coil it takes about .0030 to .0035 seconds to fully charge/saturate the primary coil and that is reflected by the green horizontal line on the lower portion of the above chart. The blue and red curves reflect the time the points are closed for the minimum and maximum dwell angles through the full range of RPM's that a CT90 engine would typically operate at.
At lower RPM's the gap above the green line but below the blue and red lines represents the excess amount of time beyond where the coil is already fully charged where the points are still closed and current is still being applied to the coil unnecessarily and potentially can lead to heating of the coil. While coil heating can be an issue in some automotive applications, I have never heard of any CT90 coils being damaged in this way, so it really isn't a concern.
Where the chart gets interesting is out around 5800 RPM's as the blue minimum dwell curve starts to fall below the green line which indicates that the points will not be closed long enough to fully charge the coil which could lead to a weak spark at the plug that will get progressively weaker as the engine RPM's continue to increase. With the maximum dwell angle (smallest point gap) this does not become an issue until you get out around 8000 RPM's.
If you have a CT90 that tends to mis at high RPM's one of the first things you may want to consider is adjusting your point gap and shift it towards the minimum so that you will have the maximum dwell angle and therefore be fully charging your coil throughout most of the RPM range of the engine.
Based on what I have learned in trying to fully understand the CT90 ignition system, I tend to always gap my points at the minimum and if I have time to spare I'll pull out my dwell meter and check to make sure my dwell angle is around 72 degrees of the cam angle or 18 degrees using the 4 cylinder scale on my dwell meter.
With the dwell angle fully understood and set, we will now turn our attention to adjusting the timing.
Adjusting a CT90 Timing Both Statically and Dynamically
In a previous post here at this link I went into detail on how to statically time a CT90, so I won't repeat that information again here.
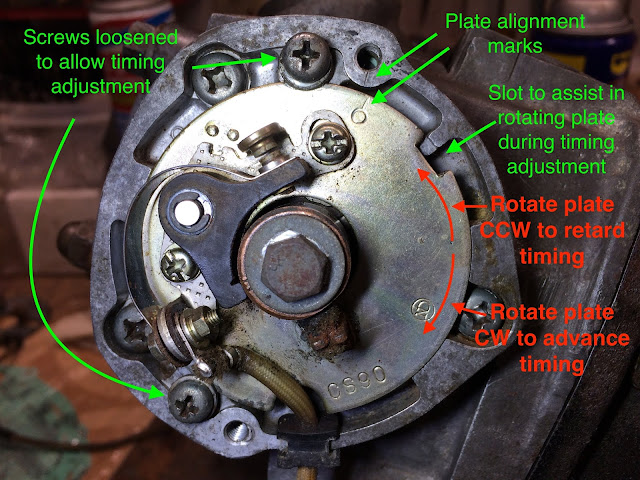
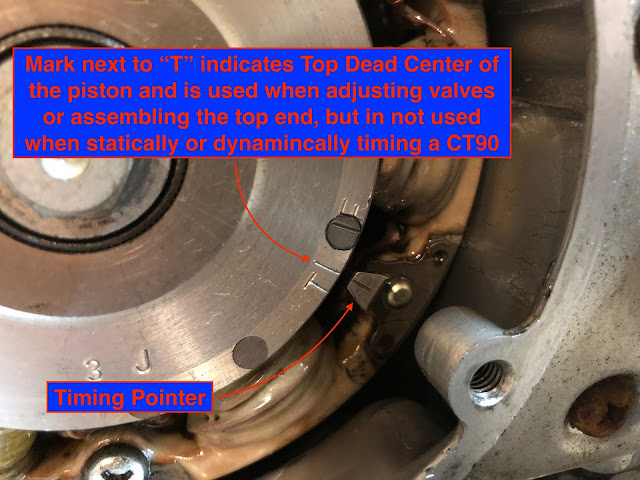
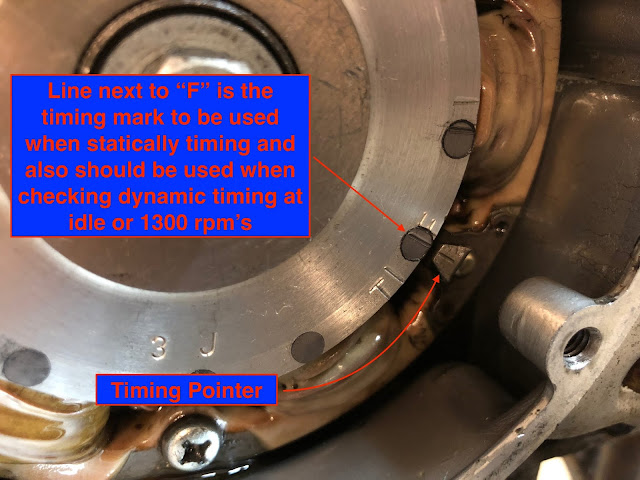
Before we get into the steps to dynamically time your CT90 I think it's important to review the basic features of the points plate involved with adjusting your timing and also the timing marks utilized on the generator rotor.
The following is a picture of the points plate with the features labeled that are used in the timing process.
The following three photos are of the generator rotor and have labeled comments on the significant markings associated with the timing process.
We still need three more things before we can dynamically time our CT90 and they would be an RPM meter, a timing light, and most importantly a clean working spark advancer with good springs.
What I used to display RPM's was an inexpensive Tach and Hour meter I picked up on Amazon. The meter is pretty basic and only updates every half a second or second, but it is more then adequate for use in dynamically timing my CT90. Here is a link to the meter at Amazon in case you are interested.
The way the meter picks up the spark plug firings is by wrapping the end of the wire coming from the meter five or six times around the spark plug wire and then securing it like is shown in the picture below.
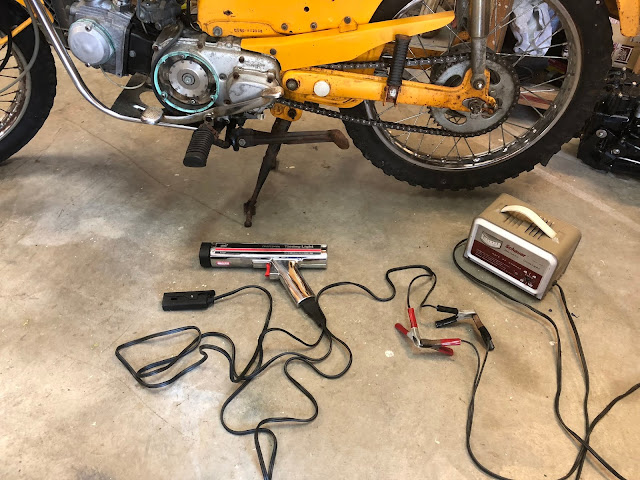
For a timing light I just used a Craftsman timing light that I have owned for over 40 years powered by a battery charger. In the end the battery charger would not power the timing light more then for a short period of time, so I had to end up powering it off of a normal car battery.
Last but not least is that if you plan on dynamically timing your CT90 with a timing light your spark advancer really needs to have a good set of springs. If the springs in your spark advancer are weak, then your spark advancer may already be advancing your spark by a significant amount at idle. If you hook up your timing light and adjust your timing to back out the advance due to your weak springs by retarding you timing significantly at idle, you'll just end up making your CT90 hard to start because the timing will be way too retarded.
The CT90 I used for this post had a spark advancer with weak springs and I'll go into how I corrected that issue below.
With all the pieces in place the next step is to go through dynamically timing your CT90.
Here are the steps:
1. Statically time the CT90
2. Start the bike and with it idling at approximately 1300 RPM's, verify with a timing light that the line/mark next to the "F" on the generator rotor lines up with the fixed timing pointer.
3. If the line/mark next to the "F" does not line up then rotate the points plate to advance or retard the timing so that the line/mark does line up with the pointer.
4. Next increase the RPM's on the bike up to approximately 3500 RPM's and verify the timing pointer is pointing somewhere between the two advance timing lines on the generator rotor.
5. If the pointer at 3500 RPM's end up pointing somewhere beyond the line/mark next to the "F" but short of the two advance timing line/marks, then the spark advancer should be removed and inspected to make sure it is clean and operates freely.
The actual Test
With the CT90 I am using to make this post, I found that when I checked the initial timing at idle with a timing light it showed the timing advanced by 8 to 10 degrees. I know I wasn't 10 degrees off when I set the timing statically, so I suspected that the springs on my spark advancer were weak, but to see what would happen I retarded the timing to bring back the mark next to the F to be in line with the timing pointer dynamically. After making this adjustment the bike became very hard to start, so to do this right I knew I needed to go in and tune the springs on my spark advancer to make sure that the advancer was not adding any advance at idle.
My first attempt to correct the significant amount of advance I was seeing at idle was to remove the spark advancer and check and document the length of each spring and then using needle nose pliers, I was able to shorten the overall length of each spring buy tightening up the curl/hook at each end. Using this technique I was able to reduce the length of each spring by approximately 0.040 inches. I didn't put much thought into how much I would shorten the springs and just tried to get the maximum amount I could and still install the springs back on the advancer.
Following this shotgun approach to fix the issue I was only partially successful. While I fixed the issue of having 8 to 10 degrees of advance at idle, I completely failed in that I had shortened the springs so much that the spark advancer didn't increase the advance to any degree no matter what RPM I increased the engine too. So it was back to the drawing board to put a little more thought into how I needed to approach fixing this issue.
For my next attempt to fix this issue and get the springs on my spark advancer turned to be "just right", I decided to adjust each spring so that I would have the exact same amount of preload or stretch at the idle position where the cams weights on the spark advancer are fully retracted.
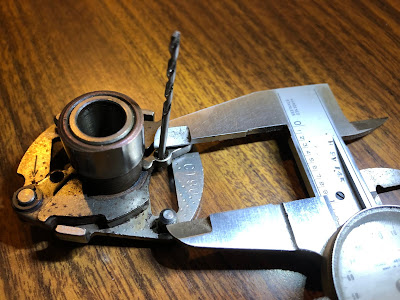
To obtain the exact same amount of preload or stretch in each spring, I needed to know what the dimensions were of all the features used to retain the springs in each position on the spark advancer. Using a set of calipers and a drill as shown in the picture below, I took measurements of all the various features on the spark advancer and the diameter of the spring wire and I was able to calculate the baseline length of each spring interface on the advancer (they are different).
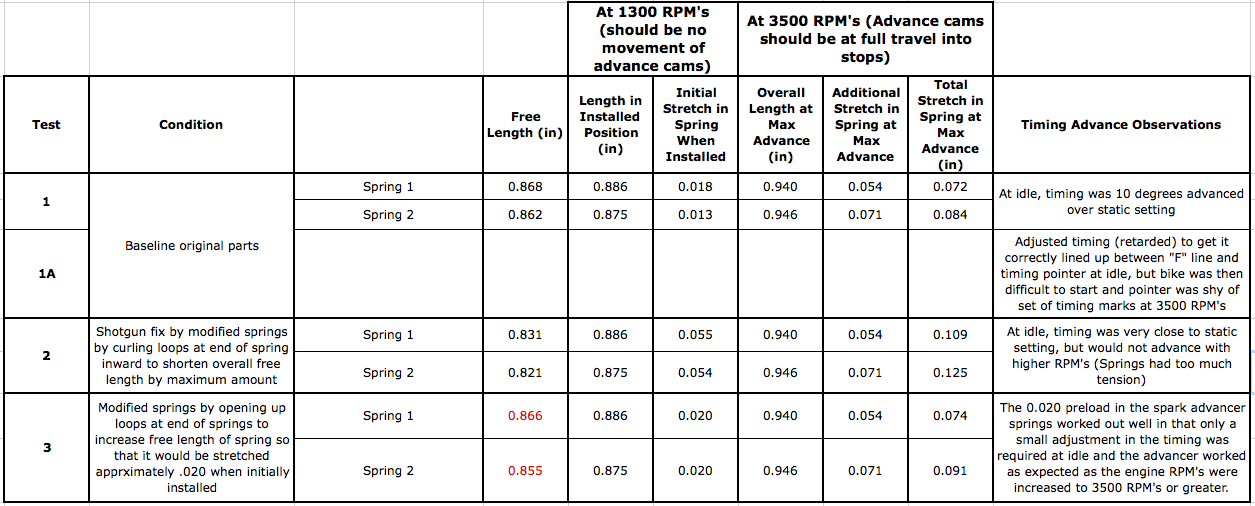
Since I had documented what the original length was of each spring before I took my shotgun approach, I was able to back calculate how much baseline stretch/preload I had in each spring and it was 0.018 in Spring #1 and 0.013 in spring #2. The initial stretch/preload while not enough, was close to being acceptable, so I decided to adjust the length of each spring so that there would be 0.020 of initial stretch/preload and reinstall the modified spark advancer in my CT90 and see if it got me what I was looking for.
The 0.020 of initial stretch/preload worked out to be just what was needed and only a minor timing adjustment was required from the static setting to when it was checked with a timing light at idle. The spark advancer also advanced as expected up to 3500 RPM's where the pointer ended up between the two marks on the generator rotor.
Here is a short video showing the static timing setting and then after all the final adjustments had been made, showing the timing being checked with a timing light at idle and at higher RPM's showing how the timing advances with engine RPM's.
I have also included the table below to clarify all of the steps I went through to dial in the tuning of the springs on the spark advancer with the final spring lengths shown in red below (you should be able to scroll to the right to see the whole chart).


Summary
I hope the information I shared in this post is interesting and useful to others working on their CT90's. For myself, while I will always agree that dynamically timing your CT90 is the ideal approach, I will most likely still just statically time my CT90's and call it good. I didn't notice much if any change in performance on this CT90 that I dynamically timed, so I doubt I will go to all the trouble on my other bikes. I will take the time in the future to ensure that the springs on my spark advancers have approximately 0.020 initial stretch/preload to minimize any advance being added at idle. The CT90 does not have a sophisticated advance curve, and kicks in most of the timing advance at relatively low RPM's, so if your spark advancer is working correctly and you have good springs, I think statically timing your CT90 will give you more then adequate performance.
Helpful Links (Shop Manuals, Wire Diagram, Model Information, etc.)
Link to page with listing of CT90 parts available on Amazon
I also did an earlier post that included how to statically time a CT90 at the following link: The Basic Sequence and Process to Set or Adjust your CT90 Timing
In addition to the mechanics of setting the dwell and timing, I will also dig down and share some additional insight in a few areas that are hopefully interesting and helpful to others interested in dynamically timing a CT90.
Listed below are the steps I plan on following when setting my CT90 timing dynamically:
1. Dress and clean the points
2. Set the point gap /dwell angle
3. Check the dwell angle with the dwell meter
4. Set the timing statically
5. Check the timing dynamically at idle and verify that it has not changed significantly from the static setting (ideally not more then a few degrees). If out a significant amount, adjust the timing so that dynamically at idle the pointer lines up close to the mark next to the F on the generator rotor.
6. Increase the engine RPM's to approximately 3500 RPM's and verify that the timing advances with RPM's and that the maximum advance results in the pointer being within the two advance timing marks on the generator rotor.
7. If after performing the above adjustments my CT90 runs great at idle and at speed, then I will document the dwell angle and other timing information so that the next time the bike doesn't seem to be running well or if I had to do work on the bike, I have an initial set of settings to use that worked well in the past.
To help myself better understand the different events going on within the CT90 engine I put together the chart below (you should be able to scroll to the right to see the whole chart).
From the chart above you can see that there are two basic things being accomplished when you adjust the points/set the dwell angle and then set the timing:
1. With the dwell angle you are determining the time available for current to be applied to the primary coil and allow it to reach its full potential or become saturated.
2. With the timing you are positioning the dwell period so that when it ends and the points open (which results in a spark at the spark plug) that it is at the ideal point in the stoke before top dead center.
You can also see in the chart the effect the spark advancer has on shifting/advancing the dwell period at higher RPM's. Since the fuel/air mixture in the cylinder burns a a constant rate you need to advance the point in time the spark ignites the mixture at higher RPM's so that there is enough time for the pressure in the cylinder to build up to the maximum level that coincides with the ideal point in the stroke after top dead center that will produce the greatest amount of power.
Setting the Dwell Angle
The first step in dynamically timing a CT90 is to set the dwell angle by adjusting the gap in the point assembly. Once the gap is set then the bike can be started and a dwell meter attached and with the engine running, verify that the desired dwell angle has been achieved. If not then the points can be adjusted and the process repeated until the desired dwell angle is reached.
The first time you take this approach you really won't know what dwell angle to adjust your points too, but the real benefit from using a dwell angle verses just setting the gap in your points is that once you find a point gap/dwell angle and timing setting that works well with your bike, you will be able very accurately go back and recreate that same dwell angle in the future. Using feeler gages to set the gap in your points and therefore the dwell angle, can be a very repeatable process and is generally more then adequate, but using a dwell meter gives you a direct reading of what you are really trying to accomplish.
A good practice when setting your dwell angle is to make sure the points are in good shape, flat, and clean. If there is any question, then you should dress your points with an appropriate file and clean them as well, so that they have a nice clean electrical break when they operate.
Whenever I provide a dwell angle in this post, I will refer to that angle in degrees of the "camshaft rotation" which is actually half the angle of rotation of the main crankshaft due to the gear driving the timing chain on the crank only having half the teeth of the timing gear that is driving the camshaft.
To measure the actual dwell angle I used an old Craftsman Engine Analyzer I own that includes a dwell meter. The picture below is of the meter setting on the rear rack of the bike connected to my CT90. I used a 12 volt battery charger to power the dwell meter and one detail you need to be aware of when taking this approach is that you need to ground the negative lead of the meter and battery charger to the CT90 for the meter to work correctly.
The only other connection from the meter to the CT90 is with the one lead that needs to be connected to the lead from the ignition coil to the points which I just connected as shown in the picture below.
The only issue with using this meter on my CT90 is that it only has a scale for 8, 6, and 4 cylinder engines and nothing for a single cylinder engine like my CT90. This ends up only being a minor issue as you can use the reading from the 8, 6, or 4 cylinder scales with a little math to get to a correct reading for a single cylinder CT90.
To convert the dwell angle measured on a CT90 using a meter for a multi cylinder engine, you would multiple the indicated reading from the meter by the ratio of the degrees of distributor cam rotation required to fire a single cylinder one time between the CT90 and the multi-cylinder engine scale you were using from the meter.
For a CT90 the overhead cam directly drives the cam lobe that actuates the points assembly and it requires 360 degrees of cam rotation to fire the spark plug one time. For an 8 cylinder engine the distributor cam only has to rotate 45 degrees to fire each spark plug compared to 60 degrees and 90 degrees on a 6 cylinder and 4 cylinder engine respectively.
Example for 8 cylinders engine: CT90 Dwell Angle = 360/45 * reading from meter for 8 cylinder
Example for 6 cylinders engine: CT90 Dwell Angle = 360/60 * reading from meter for 6 cylinder
Example for 4 cylinders engine: CT90 Dwell Angle = 360/90 * reading from meter for 4 cylinder
The resulting CT90 dwell angles from the examples above would be in degrees of the overhead cam. To convert the dwell angle that is in degrees of the cam rotation to degrees of the crank rotation you would simply multiply by two.
For example if you used the eight cylinder scale on a dwell meter connected to your CT90 and the reading was nine degrees, then the dwell angle in terms of CT90 cam rotation would be equal to 9 x (360/45) = 72 degrees. In terms of CT90 crank rotation it would be 2 x 72 = 144 degrees.
From the Honda CT90 manual, the recommended point gap setting is .012 to .016 inches. I wanted to know what the corresponding dwell angle would be for each of the end values from the Honda recommended range, so I first set the points to .012 inches and then recorded the dwell angle and then I set the points to .016 inches and also recorded the dwell angle.
Here are the results for my CT90:
Given that the Honda manual states an acceptable range for your point gap to be within, you may ask yourself why should I care what my point gap is as long as it is within the recommended range? The short answer is that for the most part it probably doesn't make much of a difference, but it is good to understand how the point gap and resulting dwell angle impact the charging of your coil.
I put together the following chart to show the relationship between the time available to charge/saturate your coil verses engine RPM's for both the minimum and maximum dwell angles.
For a typical ignition coil it takes about .0030 to .0035 seconds to fully charge/saturate the primary coil and that is reflected by the green horizontal line on the lower portion of the above chart. The blue and red curves reflect the time the points are closed for the minimum and maximum dwell angles through the full range of RPM's that a CT90 engine would typically operate at.
At lower RPM's the gap above the green line but below the blue and red lines represents the excess amount of time beyond where the coil is already fully charged where the points are still closed and current is still being applied to the coil unnecessarily and potentially can lead to heating of the coil. While coil heating can be an issue in some automotive applications, I have never heard of any CT90 coils being damaged in this way, so it really isn't a concern.
Where the chart gets interesting is out around 5800 RPM's as the blue minimum dwell curve starts to fall below the green line which indicates that the points will not be closed long enough to fully charge the coil which could lead to a weak spark at the plug that will get progressively weaker as the engine RPM's continue to increase. With the maximum dwell angle (smallest point gap) this does not become an issue until you get out around 8000 RPM's.
If you have a CT90 that tends to mis at high RPM's one of the first things you may want to consider is adjusting your point gap and shift it towards the minimum so that you will have the maximum dwell angle and therefore be fully charging your coil throughout most of the RPM range of the engine.
Based on what I have learned in trying to fully understand the CT90 ignition system, I tend to always gap my points at the minimum and if I have time to spare I'll pull out my dwell meter and check to make sure my dwell angle is around 72 degrees of the cam angle or 18 degrees using the 4 cylinder scale on my dwell meter.
With the dwell angle fully understood and set, we will now turn our attention to adjusting the timing.
Adjusting a CT90 Timing Both Statically and Dynamically
In a previous post here at this link I went into detail on how to statically time a CT90, so I won't repeat that information again here.
Before we get into the steps to dynamically time your CT90 I think it's important to review the basic features of the points plate involved with adjusting your timing and also the timing marks utilized on the generator rotor.
The following is a picture of the points plate with the features labeled that are used in the timing process.
The following three photos are of the generator rotor and have labeled comments on the significant markings associated with the timing process.
We still need three more things before we can dynamically time our CT90 and they would be an RPM meter, a timing light, and most importantly a clean working spark advancer with good springs.
What I used to display RPM's was an inexpensive Tach and Hour meter I picked up on Amazon. The meter is pretty basic and only updates every half a second or second, but it is more then adequate for use in dynamically timing my CT90. Here is a link to the meter at Amazon in case you are interested.
The way the meter picks up the spark plug firings is by wrapping the end of the wire coming from the meter five or six times around the spark plug wire and then securing it like is shown in the picture below.
For a timing light I just used a Craftsman timing light that I have owned for over 40 years powered by a battery charger. In the end the battery charger would not power the timing light more then for a short period of time, so I had to end up powering it off of a normal car battery.
Last but not least is that if you plan on dynamically timing your CT90 with a timing light your spark advancer really needs to have a good set of springs. If the springs in your spark advancer are weak, then your spark advancer may already be advancing your spark by a significant amount at idle. If you hook up your timing light and adjust your timing to back out the advance due to your weak springs by retarding you timing significantly at idle, you'll just end up making your CT90 hard to start because the timing will be way too retarded.
The CT90 I used for this post had a spark advancer with weak springs and I'll go into how I corrected that issue below.
With all the pieces in place the next step is to go through dynamically timing your CT90.
Here are the steps:
1. Statically time the CT90
2. Start the bike and with it idling at approximately 1300 RPM's, verify with a timing light that the line/mark next to the "F" on the generator rotor lines up with the fixed timing pointer.
3. If the line/mark next to the "F" does not line up then rotate the points plate to advance or retard the timing so that the line/mark does line up with the pointer.
4. Next increase the RPM's on the bike up to approximately 3500 RPM's and verify the timing pointer is pointing somewhere between the two advance timing lines on the generator rotor.
5. If the pointer at 3500 RPM's end up pointing somewhere beyond the line/mark next to the "F" but short of the two advance timing line/marks, then the spark advancer should be removed and inspected to make sure it is clean and operates freely.
The actual Test
With the CT90 I am using to make this post, I found that when I checked the initial timing at idle with a timing light it showed the timing advanced by 8 to 10 degrees. I know I wasn't 10 degrees off when I set the timing statically, so I suspected that the springs on my spark advancer were weak, but to see what would happen I retarded the timing to bring back the mark next to the F to be in line with the timing pointer dynamically. After making this adjustment the bike became very hard to start, so to do this right I knew I needed to go in and tune the springs on my spark advancer to make sure that the advancer was not adding any advance at idle.
My first attempt to correct the significant amount of advance I was seeing at idle was to remove the spark advancer and check and document the length of each spring and then using needle nose pliers, I was able to shorten the overall length of each spring buy tightening up the curl/hook at each end. Using this technique I was able to reduce the length of each spring by approximately 0.040 inches. I didn't put much thought into how much I would shorten the springs and just tried to get the maximum amount I could and still install the springs back on the advancer.
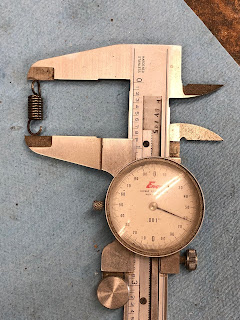 |
| Spring #2 - Length 0.862 before adjustment |
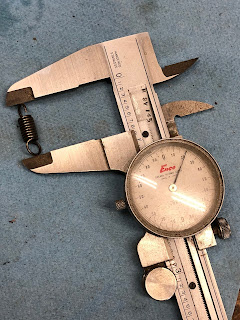 |
| Spring #2 - Length 0.821 after adjustment |
Following this shotgun approach to fix the issue I was only partially successful. While I fixed the issue of having 8 to 10 degrees of advance at idle, I completely failed in that I had shortened the springs so much that the spark advancer didn't increase the advance to any degree no matter what RPM I increased the engine too. So it was back to the drawing board to put a little more thought into how I needed to approach fixing this issue.
For my next attempt to fix this issue and get the springs on my spark advancer turned to be "just right", I decided to adjust each spring so that I would have the exact same amount of preload or stretch at the idle position where the cams weights on the spark advancer are fully retracted.
To obtain the exact same amount of preload or stretch in each spring, I needed to know what the dimensions were of all the features used to retain the springs in each position on the spark advancer. Using a set of calipers and a drill as shown in the picture below, I took measurements of all the various features on the spark advancer and the diameter of the spring wire and I was able to calculate the baseline length of each spring interface on the advancer (they are different).
Since I had documented what the original length was of each spring before I took my shotgun approach, I was able to back calculate how much baseline stretch/preload I had in each spring and it was 0.018 in Spring #1 and 0.013 in spring #2. The initial stretch/preload while not enough, was close to being acceptable, so I decided to adjust the length of each spring so that there would be 0.020 of initial stretch/preload and reinstall the modified spark advancer in my CT90 and see if it got me what I was looking for.
The 0.020 of initial stretch/preload worked out to be just what was needed and only a minor timing adjustment was required from the static setting to when it was checked with a timing light at idle. The spark advancer also advanced as expected up to 3500 RPM's where the pointer ended up between the two marks on the generator rotor.
Here is a short video showing the static timing setting and then after all the final adjustments had been made, showing the timing being checked with a timing light at idle and at higher RPM's showing how the timing advances with engine RPM's.
I have also included the table below to clarify all of the steps I went through to dial in the tuning of the springs on the spark advancer with the final spring lengths shown in red below (you should be able to scroll to the right to see the whole chart).
Summary
I hope the information I shared in this post is interesting and useful to others working on their CT90's. For myself, while I will always agree that dynamically timing your CT90 is the ideal approach, I will most likely still just statically time my CT90's and call it good. I didn't notice much if any change in performance on this CT90 that I dynamically timed, so I doubt I will go to all the trouble on my other bikes. I will take the time in the future to ensure that the springs on my spark advancers have approximately 0.020 initial stretch/preload to minimize any advance being added at idle. The CT90 does not have a sophisticated advance curve, and kicks in most of the timing advance at relatively low RPM's, so if your spark advancer is working correctly and you have good springs, I think statically timing your CT90 will give you more then adequate performance.
Helpful Links (Shop Manuals, Wire Diagram, Model Information, etc.)
Link to page with listing of CT90 parts available on Amazon




Comments
Post a Comment